Not just car cleaning..............
So your another proud Hot Orange Cabrio owner? Good!!! Whatever marque your car is your assured of a very visible and distinctive presence on the road, the Hot Orange colour really stands out from the crowd. To get the best and the most admiring glances, then it is your duty to keep the baby clean and sparking! The following is intended as an introduction to how to do this, and what techniques and products are around that might help. No one here is an expert and everything is provided in good faith with of course no liabilites accepted, you need to confirm things for yourself. But having said that, its not rocket science, but the differences in caring for your baby will mean higher resale values too, so worth adopting some of the techniques in any event.
Grit, the enemy!!!!
This site is all about enthusiasts. We don't work in the trade, were not doing this for profit, its for fun, the real reason for being a Mini owner. But the hints and tips and experiences we have had might help you get the best out of your Mini (or other car too), and as such, were happy to tell you about what we have done, how it was done, the whys and wherefores too.
So what do we know about preparing your Hot Orange Mini and getting it to sparkle...... Firstly its a rich bright colour that just cries out to be clean and as summer approaches its contrast and visibility with the roof down is close to the ultimate posing ability!!!! But getting this lovingly build and owned car to a standard and keeping it there needs a bit of knowledge about the cleaning process.
Recently (well recently ish...) the channel 5 motoring program took a survey on car washing and damage to the paint, and it showed a jet wash was the least damaging, but the supermarket hand washers were the worst. Of course when you look at the car it will look clean but look closely.......... Can you see (particularly in bright sunlight) those repetive swirls and light scratchings......... you can can't you.
Well on top of the paint is a clear coat of laquer, helps protect the paint and give it the "wet look". This is a durable surface but never the less get scratched and worn, but it does prevent the paint itself getting overly damaged. But it is like a plastic film, see through until scratched. The cause of this scratching normally happens when you clean the car, and it is small particles of grit that do the damage. Let's look at some examples (not all of these are from Mini's....!)
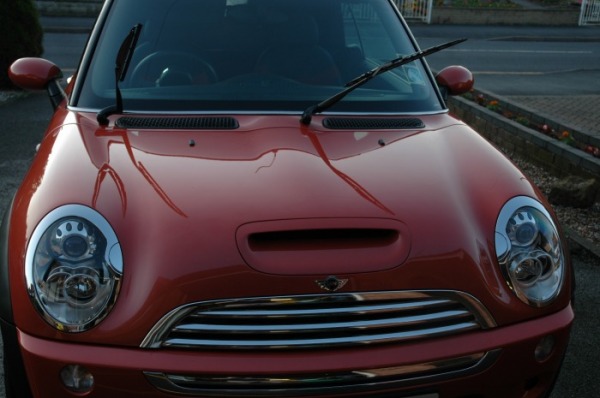
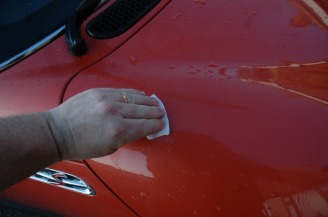
The car above had been cleaned but you can see the sunlight is highlighting paint problems and marks, if you look at the fuel filler flap you can see some fine scratching or "swirl marks" Most cars cleaned without a proper process will exhibit this and it will reduce the reflective glassy finish on top of the paint, which masks the true glory of the finish!!! Try it for yourself, get the car in direct sunlight or from another cars headlights and see the swirl..........
Now, how does this happen as you use clean water and a clean sponge don't you? Problem is grit hides in sponges, being porous in nature the grit which is really tiny and fine little particles, sits in the sponge surface and is like a very fine sandpaper in use, and gouges into the clear coat as you wash, causing the swirls and marks and ruining the finish of your Mini. And many or most people really, when having rinsed the car and you go to dry, use a chamois leather and rub this over the car too. Net result is that any grit particles that remain get caught up in the chamois and yep, you've guessed it, rub more grit in..... So the car is clean but the paint surface damaged and you simply wont get the best finish.
How do you avoid grit?
The objective of this page is to help you develop good techniques in various areas of car care but known as "Detailing". This is because so much attention to deal is done, everything is covered off!!. There are several process's that can be used to get to the ultimate finish, things such as "paint correction", 2BM wash, Pre-wash, Wax, seal, glaze........ it goes on and on, but here, were going to try and get you to use good techniques and then to link them together to give you the ultimate finish.
The singular most important and easies thing to adopt that is used all the time is washing using the 2BM method. 2BM is simply Two Bucket Method!! See were making this simple to understand too!! Now in parallel with using a suds and rinse bucket, we need to look at the material we use to actually wash the car with. I mentioned before sponges are out, and we shall speak no more of them! But we need something. The good news is that the car cleaning community has developed wash mitts. These tend to be made out of lambswool or microfibre and usually have an elasticated cuff. Purists think the Lambswool mitts are better, and personally I agree but all are far better than a sponge. Although they are a premium aid, they will still "hold" grit and other abrasive contaminants in their materials but at a far lesser rate than a sponge, which is why we have two buckets. In the SUDS bucket, we only ever load suds and water onto the mitt. When we have used it, rather than top it straight up with more suds, it goes in the rinse bucket, where the offending particles are hopefully washed out.
So, find two good clean buckets, purchase a wash mitt (or two) and were ready to start. We could also add a grit guard...... Simply a bit of round plastic with some legs that sits at the bottom of both buckets, and you physically rub the mitt against them when loading suds or rinsing. The structure allows grit to fall to the bottom of the bucket and keep it from getting back on your mitt. Now add shampoo and start the minefield of choice. Basically don't use household detergents like Fairy Liquid unless you want to strip the wax off, these detergent based products will be very harsh to your paint surface.
Do use a good quality car shampoo. Look for one that has conditioner built in, and don't go cheap, but value for money. There are a lot out there, and many are very good, check out Detailing World on the web for extra advice and experience on shampoo choice as well as methods for cleaning the car.
Assuming the car has already been wetted with a hose, or watering can, or pre-washed (which we will talk about later) then its time to wash!!!
Now use warm water, not hot but warm, mix your shampoo genrously and away you go!!! If you have not got grit guards only load from the suds bucket and rinse in the top 1/3 of the bucket and never scoop form the bottom. Do a panel at a time and thoroughly wring out and rinse the mitt after each panel. Use gentle but firm pressure agains the surfaces and always ensure you have plenty of suds. Start at the top and wash down making sure all the bodywork is done before you do the wheels, which you need to do too!!!!
Make sure the car is in shade and cool as sunlight and hot will make it dry leaving it patch and horribly and the water stains may also carry contaminants that will scratch the surfaces, so keep it moist at all times!
Finished, excellent! Now time to rinse, sheet off and dry, all bits covered later on!!!! Just out of interest....... have a look at the colour of the water in the rinse bucket and when you empty both out, look at the grit and bits and pieces that would have just been used to swirl and mark your car during washing...........
Time to dry.....
Ok so we have now given our beloved Orange cabrio a totally new type of wash, and she should be all sopping wet. As your techniques improve and dependant on the protections used, you will see the water beading on top of the surface of the paintwork. You should see this too on the hood but to a lesser extent, and we will talk about cleaning that later. But for now, were going to make sure we don't do any damage to the surface by using bad drying practices. The word is Microfibre. These are specially formed fibres on a towel that are super absorbent and will lift and absorb water from the surfaces of the car. Remember what were trying to do is avoid scouring the surface of the paintwork and creating those horrid swirls. Most of us will have used a chamois leather and will rub the surface of the car until the chamois is fully soaked. Then we wring it out and return it to the surface. Any contaminant, grit particle etc, will simply get used as a piece of sandpaper and ruin our paintwork, negating the benefits of the 2BM wash.....
So what we do now is much easier in fact than a chamois and will also ensure a quality non marking drying process. Now you have got the car in cool shade haven't you? If not the sun is likely to dry the car for you and leave lots of horrid watermarks, get the car in the shade firstly.
Here is a useful tip called water sheeting. If you go back to your science days at school you will remember that water trys to stick together through water tension, its why a boat floats by the way!! Now we can use this property to our advantage. If you take a hose pipe with a reasonable flow of water and turn it 90 degrees the surface of the bodywork and then play the water on the surface, watch how the water splays out along a large area. Now take the hose directly off, and you will see the "sheet" of water you created keeps quite together and rushes off the car. This technique called sheeting gets the water to move as one body and uses its own tension to keep the water together as it flows off the car. If you use this technique starting as ever at the top and move downwards constantly keeping a sheet of water in place, it will remove a quantity of water in excess of normal rinsing off with pressure!! And I have tried it lots and can earnestly tell you it works!!!
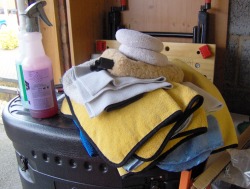
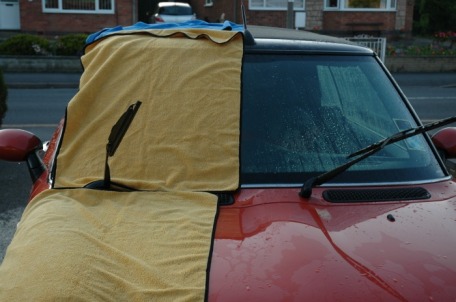
Once sheeted its time for the towel. The picture shows my collection ready for use, I have in truth about 10 towels, they are very versatile but I have about 5 I use for drying only, two huge ones and several about 12" square.
Now, here is where bigger is better. There are a range of microfibre towels, some small some huge some with better absorbency. For me, my experiences go to the larger towels, as you can lay more of the towel on the surface and suck up more water quicker. Lay your towl on the surface, roof or metal, and then pat dry the area. Start from top to bottom and never "rub" anywhere, keep lifting the towel and moving to another part of the car with some overlap and pat all over. If you do the roof first, just see how much drier that area you have worked on is compared to the rest. Depending on the size and quality of your towel, you may need to wring it out, then again you might not!! I use the sonus wonderdry towels which are huge. I use two on the Mini and one smaller towel for the wheels and tyres. Don't forget the door shuts too, and on Mini Convertibles, make sure you dry the roof before opening the door, else it all leaks in!!! I find the worst part to dry are the hinges at the back, they seem to cling on to the water and it always drips down, simply keep going round and place the towel or part of it in the area and let it absorb the water. There is some effort involved in being quick to stop the water marking but this method is not only in keeping with the good technique of swirl avoidance, but is much easier than a chamois. 10 minutes and it should be perfectly dry!
If you have completed the 2BM and the aboveyou will now have a nice gleaming Hot Orange Cabrio.... but its only clean, its not sparkly!!!!!
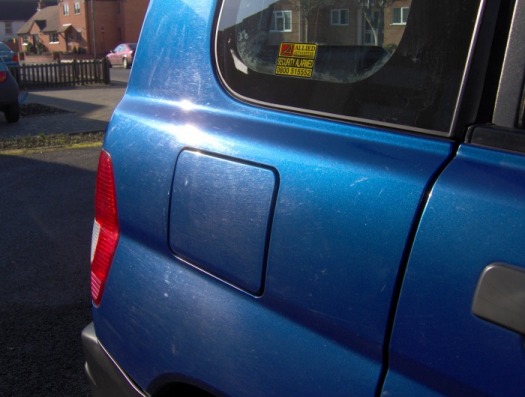
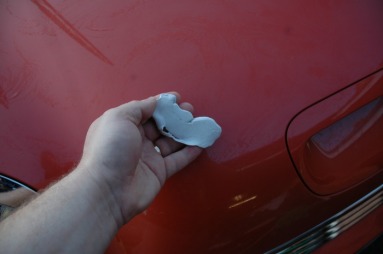
The picture is pumpkin all ready to be clayed. If you look closely you can see water lying flat on the surface and not beading in any way. This shows the protection of wax, selants, glaze and the like is missing and the paint is open to the elements. This is to be avoided as it will allow the paint to detiorate quickly, so only when your prepping for a better quality finish is this a good thing. Have a look at your baby next time, is the water beading up into tight water globules or not....?
So to start with I would strongly reccomend you use a soft or medium clay. Now, don't go putting it straight on the car, its adhesive properties would stick and grate across the paint surface leaving hard to get out clay marks. You MUST use a lubricant. Now here is the big debate, water, suds, detailer, proper lube, its all out there and each has good and bad properties. And with experience inevitably comes the chance to try new lubricants. What works for me is just that, but I would say a lot of the stuff you can read on detailing tends to show the same intention, and that is a detailing spray. These sprays are primarily designed to spray on to a finished cleaned and waxed car to slightly enhance the look by reducing dust and stuff and leaving a "polished" surface. The brilliance of this liquid is that is is also a good lubricant, and good for the paintwork!! So use one of these and again you wont go far wrong.
Recap, we have cleaned and dried the car, although you don't have to dry it fully if your going to clay, some do, some don't, I have done both! In the pictures here, Pumpkin was not dried after being washed.
The clay bar can usually be cut into two pieces, the trick is to keep it warm, which even in hot weather is hard as it will be in contact with the surface of the car and will tend to cool down. You want it malleable and not stiff, and across your three forefingers so you can use a bit of pressure but not too much. So in one hand the detailing spray, the other the clay, spray a 12 inch area on the surface of the car and rub the clay so that you can feel it has pressure but is not "dragging on the surface". You can go back and forward, circles, whatever it does not really matter but a good combination of moves like these will ensure you give a chance for the contaminant to latch into the clay, like pulling a splinter, sometimes it goes out the way it came in! Overlay by an inch or so and take another area and go for it and keep repeating across the whole car. Don't try vinyl trims and the like, it will just leave a horrible mess!
Now as the contaminants begin to come out and lay in the clay, at some point there will possibly be enough to "fold the clay" to get a clean edge. Don't roll it up into a ball, but take fold it back on itself so that the contaminants are now on top of the clay and a clean surface is below. Keep checking, folding and keeping warm all the way through and before you know it, the car will be clayed. Now rub your hand across the surface.... smooth eh??
So, now we have clayed the car, you need a really good and careful 2 bucket wash and dry as above. Bear in mind that the paint surface will very little protection on it, so its important to try and move on with the glazing, sealing and waxing as soon as you can, but we have to be realistic on this.
Just to keep you interested, this is about half way through, with the glaze and sealant applied, but before wax!